I have been very fortunate to get the chance to review many of Saitek’s Pro Flight peripherals of late. With their latest offering, the Pro Flight Multi Panel, Saitek mainly attempts to give sim-jocks a much more efficient way of handling their aircraft’s autopilot functions along with some additional things sim-pilots will no doubt appreciate (more on this later).
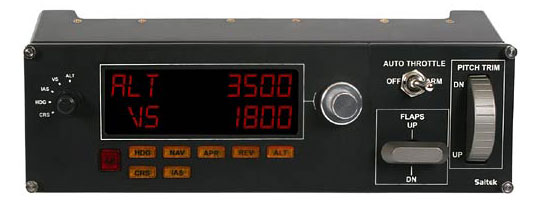
The Multi Panel is similar in form factor to Saitek’s Radio Panel albeit slightly shorter. This panel features a large LCD display for autopilot information and a heavy-duty knob to the left of the screen to switch autopilot display modes. You see, it is not as simple as pressing a single button and watching the plane magically right itself and go through your flight path for you. You actually have several different autopilot modes to choose from. Thankfully, the mode activation buttons below the LCD will allow you to select what modes you want running before you hit the master ‘AP’ button. You can select from the following autopilot modes: HDG, NAV, IAS, ALT, VS, APR, and REV.
As an example of the autopilot usage, say you want to maintain an altitude of 10000 ft and an indicated airspeed of 240 knots. You simple turn the display knob to ALT and then use the silver adjustment knob on the right of the display to increase the digits to 10000 ft. This brings up the first problem with the Multi Panel: the adjustment knob. This silver knob looks like the two-way frequency adjustment knobs on the Radio Panel but instead of having the lower ring of the knob turn independently and increase the display by a higher amount than the upper knob ring, the Multi Panel’s adjustment knob is fused. This means that turning to 10000 will take you quite a while.
After getting to 10000 ft on the ALT display, then you can select IAS with the mode knob and go back to the adjustment knob until you get to 240 knots. Since the two autopilot modes you care about have been set you can hit the IAS and ALT buttons below the LCD to pre-select them. After this the only left to do is confirm your choices by pressing the AP button to activate. Remember to also set the autothrottle toggle to the ARM position, otherwise the IAS mode will not work. It is a safety mechanism allowing you to independently engage and disengage the IAS mode in case of emergency. After engaging the AP master button you will notice your plane smoothly begins its climb to your selected altitude. Simple!
This method of utilizing an aircraft’s autopilot is light years beyond the point-and-click method in Flight Simulator X. Switching all of those little buttons and knobs with the mouse cursor acting as a ‘virtual hand’ is often infuriating. Plus, like the other Pro Flight peripherals it makes you take your focus off of your screen and onto a physical object slightly in front of you. This adds to the overall feeling of depth and immersion you get with the sim making for a wholly more enjoyable experience.
The Pro Flight Multi Panel also has some other features which make a sim-jock’s best friend. The largest of these features is the large trim wheel on the panel’s right side. When flying an aircraft, this trim wheel allows you to adjust the trim of the elevators which control pitch. By using these slight adjustments you can fly straight and level without much user-control of the yoke. Usually in flight simulators you have to use some virtual trim wheel or a combination of key strokes to achieve this. The problem is that without the tactile feedback of an actual wheel, control like that is too imprecise to be useful. This larger and real wheel on the panel allows for very subtle changes in aircraft trim. It is the first time I have been able to successfully use pitch trim in my entire flight sim history.
The second problem I encountered with the Multi Panel actually had to do with its plastic mounting bracket. Like the other Pro Flight panels it just feels a bit too shaky, especially when stacked up two or three panels high. The flex in the plastic mount makes me instinctively want to brace the panel with my hand when pressing buttons. Thankfully on this panel the buttons that do exist do not require much forward force to activate. The rest are either knobs or toggles which did not seem to make the bracket flex very much.
Aside from the autopilot and trim controls, the Multi Panel offers you a toggle switch to control the extending and retracting of your aircraft’s wing flaps. Since precise control of these is done by increasing or decreasing them in incremental amounts, keyboard control usually works fine. However, it is still a nice addition to the panel which adds a bit more realism to the experience.
Like the rest of the Pro Flight line, installing the Multi Panel is extremely simple. Install the software from the included CD-ROM and plug it into USB 2.0 port. It is pre-configured to integrate into Microsoft’s Flight Simulator X and requires no additional programming or button-assigning.
For the ultimate in autopilot controls as well as some other very valuable tools to make your experience as a sim-jock more realistic, and actually easier in the process, Saitek’s Pro Flight Multi Panel is an indispensable tool in the home cockpit.