Author - Jerry Paxton

CH Products Pro Throttle Review

The throttle assembly is an integral part of any homebrew cockpit, whether you are building a full-scale replica of a 747 cockpit or throwing some random peripherals together on your home office desk. Most of us fall into the latter category but just because we have limited space and budgets doesn’t mean we necessarily have to skimp on quality.

CH Products, long-known for their flight sim peripherals, has a great option for your throttle-needs with their simply-named ‘Pro Throttle’. Featuring an all-black plastic body the Pro Throttle has the overall curves and design of its predecessor models which used CH Products’ GamePort interface. Thankfully, this throttle uses a USB interface making programming a ton easier (but more on that later). Unique to the CH Products’ throttles has always been their sliding action. Most throttles utilize a pivoting action from a single point on the side of the quadrant. The Pro Throttle controls with a smooth glide forward and backwards on a central track. The feeling is quite natural although I would liked to have seen the option to adjust the resistance.

Also, for the size of the Pro Throttle it is actually quite light, roughly 3lbs. Moving the throttle forward and backwards can make it slide a bit on smoother surfaces, even with the four rubber boots it has to try and stop this motion. I would have preferred to see CH Products fill the base of the throttle quadrant with some heavy elements to give it a more immovable feel. Another option would have been to provide some screw holes in the four corners of the quadrant base to allow sim-jocks to screw the Pro Throttle into a static place.

You may think that I did not like the Pro Throttle with these criticisms. Far from it, actually, as I found the Pro Throttle to be a joy to use in multiple combat simulations, ranging from Wings Over Europe to Lock On: Modern Air Combat.

Installing the Pro Throttle is fairly simple either way you choose to go about it. The first option is to plug it straight into a USB 2.0 port on your PC and allow Windows to register it as a game controller. This allows you to use all of the sticks and axes available. However, you can also choose to install the CH Control Manager as well. The CH Control Manager is a proprietary bit of software from CH Products which can unlock the full potential of your Pro Throttle.

On the throttle handle of the Pro Throttle you will find an array of controls. There are a total of three standard buttons along the front of the handle, a four-way hat for your index finger, two additional four-way hats for your thumb as well as a hat switch and mini-joystick. That’s a lot of controls available to you – 24 control channels to be exact. The interesting thing about the mini-joystick is that when depressed it also acts a mode switcher, allowing you to cycle through ‘green’, ‘red’, and ‘yellow’ controller modes. Each of these modes can be assigned a different function per control via the CH Control Manager. This greatly increases your control capabilities and allows you to do cool things like assign all NAV mode aircraft controls to the ‘green’ Pro Throttle mode and the ‘yellow’ and ‘red’ Pro Throttle modes to A/A and A/G aircraft modes. It is not possible to assign different controls depending on the mode without the CH Control Manager.

However, as a piece of software the CH Control Manager is fairly verbose and may turn-off casual fliers who will be confused in its usage. My advice: Don’t give up and read the help file in the CH Control Manager – it will explain everything to you in a pretty straight-forward manner. One cool thing is that the CH Control Manager works for all CH Products peripherals. You only have to install it once! The CH Control Manager also can combine multiple peripherals into a gigantic virtual controller. This will help out in those titles that only recognize one joystick in the controller stack. Mapping out the different functions will seem confusing at first but, as I previously mentioned, read the help file.

Overall, I would recommend the CH Products’ Pro Throttle to any serious flight sim enthusiast, no matter how serious or casual. It features a really fluid control system and, while a bit light, will give you a ton of control over your aircraft. It is available now with an MSRP of $149.99, however at most online retailers it is markedly less. A bigger question is: What flight stick are you going to purchase to go with it? Technically the whole purpose of a throttle and stick is to create a HOTAS (Hands On Throttle and Stick) setup where you don’t have to use the keyboard at all. While a lofty goal, many controllers just don’t give you enough buttons to accomplish this. The Pro Throttle, I’m happy to say, is NOT one of them. Check six!

Official CH Products Pro Throttle Product Page

The Secret of Monkey Island: Special Edition is Now Available from App Store


App Store? Yes, you read correctly, Lucasarts has released a version of The Secret of Monkey Island: SE for iPhones and iPhone Touch handhelds. The game will cost you a scant $7.99 and will take up a bit over 350 megabytes on your device. Totally worth it though, as the recent GamingShogun review can stipulate. The Secret of Monkey Island: SE features all-new visuals as well as voice overs and an orchestral score.

Checkout some screenshots of the iPhone version After the Break!

Review of the Saitek Pro Flight Multi Panel

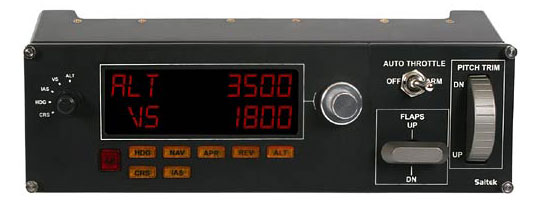
I have been very fortunate to get the chance to review many of Saitek’s Pro Flight peripherals of late. With their latest offering, the Pro Flight Multi Panel, Saitek mainly attempts to give sim-jocks a much more efficient way of handling their aircraft’s autopilot functions along with some additional things sim-pilots will no doubt appreciate (more on this later).

The Multi Panel is similar in form factor to Saitek’s Radio Panel albeit slightly shorter. This panel features a large LCD display for autopilot information and a heavy-duty knob to the left of the screen to switch autopilot display modes. You see, it is not as simple as pressing a single button and watching the plane magically right itself and go through your flight path for you. You actually have several different autopilot modes to choose from. Thankfully, the mode activation buttons below the LCD will allow you to select what modes you want running before you hit the master ‘AP’ button. You can select from the following autopilot modes: HDG, NAV, IAS, ALT, VS, APR, and REV.

As an example of the autopilot usage, say you want to maintain an altitude of 10000 ft and an indicated airspeed of 240 knots. You simple turn the display knob to ALT and then use the silver adjustment knob on the right of the display to increase the digits to 10000 ft. This brings up the first problem with the Multi Panel: the adjustment knob. This silver knob looks like the two-way frequency adjustment knobs on the Radio Panel but instead of having the lower ring of the knob turn independently and increase the display by a higher amount than the upper knob ring, the Multi Panel’s adjustment knob is fused. This means that turning to 10000 will take you quite a while.

After getting to 10000 ft on the ALT display, then you can select IAS with the mode knob and go back to the adjustment knob until you get to 240 knots. Since the two autopilot modes you care about have been set you can hit the IAS and ALT buttons below the LCD to pre-select them. After this the only left to do is confirm your choices by pressing the AP button to activate. Remember to also set the autothrottle toggle to the ARM position, otherwise the IAS mode will not work. It is a safety mechanism allowing you to independently engage and disengage the IAS mode in case of emergency. After engaging the AP master button you will notice your plane smoothly begins its climb to your selected altitude. Simple!

This method of utilizing an aircraft’s autopilot is light years beyond the point-and-click method in Flight Simulator X. Switching all of those little buttons and knobs with the mouse cursor acting as a ‘virtual hand’ is often infuriating. Plus, like the other Pro Flight peripherals it makes you take your focus off of your screen and onto a physical object slightly in front of you. This adds to the overall feeling of depth and immersion you get with the sim making for a wholly more enjoyable experience.

The Pro Flight Multi Panel also has some other features which make a sim-jock’s best friend. The largest of these features is the large trim wheel on the panel’s right side. When flying an aircraft, this trim wheel allows you to adjust the trim of the elevators which control pitch. By using these slight adjustments you can fly straight and level without much user-control of the yoke. Usually in flight simulators you have to use some virtual trim wheel or a combination of key strokes to achieve this. The problem is that without the tactile feedback of an actual wheel, control like that is too imprecise to be useful. This larger and real wheel on the panel allows for very subtle changes in aircraft trim. It is the first time I have been able to successfully use pitch trim in my entire flight sim history.

The second problem I encountered with the Multi Panel actually had to do with its plastic mounting bracket. Like the other Pro Flight panels it just feels a bit too shaky, especially when stacked up two or three panels high. The flex in the plastic mount makes me instinctively want to brace the panel with my hand when pressing buttons. Thankfully on this panel the buttons that do exist do not require much forward force to activate. The rest are either knobs or toggles which did not seem to make the bracket flex very much.

Aside from the autopilot and trim controls, the Multi Panel offers you a toggle switch to control the extending and retracting of your aircraft’s wing flaps. Since precise control of these is done by increasing or decreasing them in incremental amounts, keyboard control usually works fine. However, it is still a nice addition to the panel which adds a bit more realism to the experience.

Like the rest of the Pro Flight line, installing the Multi Panel is extremely simple. Install the software from the included CD-ROM and plug it into USB 2.0 port. It is pre-configured to integrate into Microsoft’s Flight Simulator X and requires no additional programming or button-assigning.

For the ultimate in autopilot controls as well as some other very valuable tools to make your experience as a sim-jock more realistic, and actually easier in the process, Saitek’s Pro Flight Multi Panel is an indispensable tool in the home cockpit.

Multi Panel Official Product Page

Microsoft Announces Windows 7 Released to Manufacturing

Microsoft announced today that both Windows 7 and Windows Server 2008 have been released to manufacturing. This means that the master copies have been sent off to get duplicated and packaged a gazillion times over so we can buy them come Halloween-time.

What does this mean for us gamers? Well, not a whole lot from the looks of it. Some games may have compatibility issues of course and it may garner some very slight performance gains over your Vista build, but overall it comes down to personal preference. Windows 7 seems like it will be a lot more user friendly and that can make your in-between gaming sessions a lot more tolerable. What say you?

Randy Pitchford Gives Colonial Marines Sitrep

President of Gearbox Software, Randy Pitchford, has finally thawed the ice a bit on the Aliens: Colonial Marines information flow glacier. In an interview with CVG, Pitchford claims that the project is still ongoing and, apparently, going well. Pitchford also promises that more information will be released at some point but he is finding that keeping the information lid on the project is very challenging.

”I want to tell all! But I can’t. But I can say that we are working hard and that there are great things afoot and I know that when the time is right, Sega will be excited to share more details about the game. Until that time, I guess the only thing anyone can do is just keep pressuring Gearbox and Sega to spill more beans…”

Perhaps you recall the news from back in February that the project had been seriously cutback. From how Pitchford talks about it, that does not seem to be the case.

You can also checkout our media-only look from this year’s E3 at the other Aliens game coming out: Aliens vs Predator.

Special Modern Warfare 2 Controller in the Works

Robert Bowling, Community Manager for Infinity Ward, has tweeted via his official Twitter account that Activision and Infinity Ward are teaming with an unnamed party to create a special Call of Duty: Modern Warfare 2 controller. The game is due out on November 10th and was recently touted for its very special ‘Prestige Edition‘ which will include a fully-functional set of NVGs.

From @FourZeroTwo:
‘In a design meeting for a #MW2 controller. Need your advice – Concave or Convex grips for the Analog sticks? Whats your preference and why?’

Being the renegade that I am, I prefer sticks that are neither convex OR concave. I refer to them as… ‘flat’.

EA Reveals 17-inch Eddie Riggs Action Sculpture


Electronic Arts has released the first images of the 17” action-sculpture featuring the character of Eddie Riggs from their upcoming Brutal Legend. According to the announcement email they have only made one thousand of these statues and will be giving them away via their Twitter account.

Checkout some totally metal images of the statue After the Break!

Review of the Saitek Pro Flight Radio Panel

Hot off my last review of Saitek’s Pro Flight Instrument Panel, I took a look at their Pro Flight Radio Panel. While gauges are fine and good, at some point you are going to need to communicate with the ground to do such important tasks as check request a flight following, acknowledge nearby traffic, or even something as simple as put in a request to taxi to the runway.

Microsoft’s Flight Simulator series has never been great at giving the player the ability to change their multiple frequencies. Usually I pause the game and fiddle with the mouse cursor, which acts my pilot’s ‘virtual hand’, to adjust the small and large increments to get them just right. This is just not fun and it generally ends with me doing auto-station flips via the on-screen ATC communication menu.

I can safely say that my radio issues have crashed and burned thanks to the new Pro Flight Radio Panel. In this peripheral, Saitek has designed a very good recreation of the basic radio stack found in civil aircraft. It features four bright LED readouts in the center of the panel as well as two heavy-duty mode select knobs on the left of the unit. To the right side of the radio panel you will find the macro and micro-adjustment knobs and standby buttons. The construction of the frame is in keeping with all of the Saitek Pro Flight panels and is a heavy-duty black plastic.

Its mounting frame which gets screwed into other Pro Flight peripherals (most likely the Pro Flight Yoke) is still a bit flimsier than I would like to see but it doesn’t get too much in the way. Using the Radio Panel is very simple. After mounting the unit where you like, simply install the included software and you will be all-set to use it in FSX (Microsoft’s Flight Simulator X). It is really that easy to get up and running.

Loading up FSX, I start on the parking area at KRAL (Riverside Municipal – my hometown’s airfield). I then bring the map and begin to plan my flight. For today’s excursion I plan on arriving at Orange County’s John Wayne-Airport (SNA). Its a short flight and going by visual flight rules I don’t expect any real delays or problems. Clicking on the two airports I write down both their control tower and ground frequencies. My short-range setup is to have my departure airfield as COM1 and arrival airfield as COM2. Manipulating the dials on the right of the top panel, with the left knob selecting ‘COM1’, I reach KRAL’s ground channel and hit the ‘standby’ button, which switches the ‘active’ and ‘standby’ frequencies with the other. This system allows you to setup a frequency in-flight, if you like, before you actually need to switch over to it. So with KRAL’s ground frequency as the active one and its tower frequency in the standby position, COM1 is all setup. I follow the same algorithm to setup COM2 with SNA’s ground and tower frequencies.

Thankfully, the Radio Panel is responsible for a whole lot more than just your COM channels. You can also setup your NAV frequencies in the same manner! In addition, Saitek has had the forethought to add additional modes like your transponder frequency as well as DME and ADF frequencies – very vital things to have so handy in navigation.

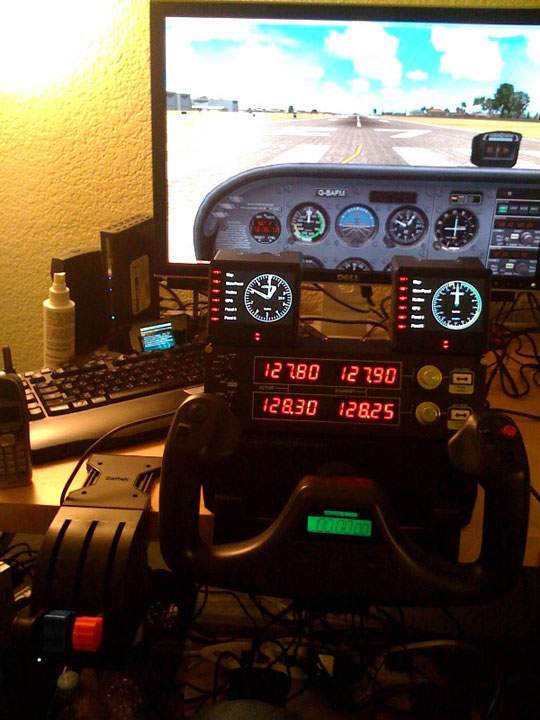
The added-convenience and tactile-feedback provided by this panel is incredible. In the image below, you can see the radio panel glowing in all its glory in lower-light conditions.

The worst issue with the Radio Panel is that even though the frequency adjustment knobs have detents built-in to give you tactile feedback when turning them, they do not always match up to the frequencies. Sometimes, you will find that you hit the frequency you are looking for in-between knob detents, forcing you to wiggle the metal control a bit until it aligns correctly.

While some would argue that the Radio Panel’s $149 dollar price point is expensive, I would say that when you look at other panels of the same function you are actually saving money by using the Saitek model in your home cockpit. GoFlight sells a larger panel of similar function and it retails for over a thousand dollars. While it is of more realistic construction than the Pro Flight Radio Panel, for the average virtual pilot you are getting a whole lot more out of your dollar with Saitek’s peripheral.

Overall, the Saitek Pro Flight Radio Panel is an excellent addition to the Saitek Pro Flight range and to your home ‘pit. It provides a ton of convenience in giving you easy-to-access radio frequencies as well as provides a new level of realism in your home cockpit with its crisp LEDs and tactile feedback.

Activision Announces Guitar Hero 5 Pre-Order Bonuses


If you are one of the many people planning to pre-order Activision’s Guitar Hero 5, know that where you pre-order will effect what bonus goodies you get!

Here is the breakdown of goodies per outlet:
GameStop – Receive two free playable songs with reservation (for Playstation®3 computer entertainment system. Xbox360® video game and entertainment system and WiiTM)
GameCrazy – Receive an exclusive faceplate with reservation
Amazon.com – Receive five free MP3s with reservation
Guitar Hero Store – Receive free two-day shipping with reservation

Guitar Hero 5 is scheduled to release on the Playstation 3 and Xbox 360 on September 1st, 2009.

Call of Duty: Modern Warfare 2 Prestige Edition Gets Officially Priced

Remember the unboxing video of the super-awesome Call of Duty: Modern Warfare 2 Prestige Edition? Well, this most awesome of game editions features real-working night vision goggles and will retail for $149.99 US Dollars. Aside from the NVGs, it will feature the steel-hardened DVD case featured in the mid-level ‘Hardened Edition’ as well as a token to download the original Call of Duty and an official art book.

The pricing information was broken by Infinity Ward’s official Twitter account only a few hours ago. So get ready to pre-order that bad boy, although no official pre-order date has been announced. No matter what edition of the game you get, it is due out on November 10th.