 A teaser for the upcoming Motorstorm 2 was released today. Word is that the sequel will take place on a non-descript Pacific island and feature up to 16-player multiplayer racing. It is gearing up for a Fall release.
Archive - 2008
The Warboard is Cyber Snipa’s flagship gaming keyboard. Here are the advertised features from Cyber Snipa’s Site
- Unique ‘Macro Force’ Software
- Anti-ghosting key architecture
- 104 keys
- 10 dual mode (20x) macro programmable buttons
- 10 multimedia keys
- 17 replaceable custom combat keys
- System: Windows Vista, Windows XP, Windows 2000, Windows ME
- Connection: USB
Design/Construction:
The Warboard features a very solid plastic outer shell, with a slick ‘armor plate’ graphic finish. There are five vertical macro keys on each side of the unit, and the outer casing around the macro-key areas is rubberized. It also comes with a rubberized wrist rest which we really found to be very comfortable in comparison to standard, plastic rests. It is also detachable for those of you who do not like using keyboard wrist rests. The ‘lock’, macro, and ‘bullseye’ keys all illuminate pretty blue led lights in the upper right-hand corner of the keyboard. We really like the looks of the Warboard. Aesthetically, it is very pleasing. Many gaming keyboards today tend to just go with an all black or silver finish. The Warboard’s design has style. Also, for as sturdy as the device feels, it is fairly light, making it easy to transport.
Usage:
Its action while gaming is very nice. The keys have a slight softness to them but are not so squishy as to have no spring-back. In addition, the 17 interchangeable keys have little gaming icons on them in case you want to make remembering what key does what a heck of a lot easier. Cyber Snipa’s provided tool makes swapping them out very simple.
The macro program allows gamers to record two different macros to each macro button via a very well-done GUI, making the total number of macro keys come to 20. It cannot record mouse movements as of yet, however. The control array at the top of the Warboard features a center key with the Cyber Snipa ‘Bullseye’ on it as well as media controls. The center key disables the Windows keys on each side of the space bar.
Thanks to the Warboard’s Anti-Ghosting technology, the cavalcade of button mashes we rained down on the keyboard during our Call of Duty IV trials went splendidly. Each key receives its own channel of communication to the computer, making it so that the dreaded Windows Sticky-Keys is not activated and also avoids a PC lock-up while it tries to figure out what keys were pressed in which order.
Function in the desktop environment was more than good enough with the keys providing a good amount of shock absorption if you have to stay up for hours typing out your homework…or a gaming keyboard review. I found myself actually using the media keys on this board unlike many others which feature small buttons. The media controls on the Warboard are robust in size with large, easy-to-understand diagrams on them of their function.
Our Druthers:
As solid as the Warboard is, there are a couple things that it could feature which would push it out in front of the saturated gaming keyboard crowd. Most notably – internal lighting. Many gaming keyboards feature some sort of internal lighting for dark-condition gaming these days. Without it, the Warboard needs an external light source. Also, the the keyboard could do with a USB and headset pass-through.
Summary:
Overall, the Cyber Snipa Warboard is a very solid keyboard with many nice features. Its lack of internal lighting does hurt it slightly in the ratings, but with a price point as low as $50 depending on the retailer, it is an excellent mid-range keyboard that performs like a keyboard selling for $30 dollars more.
You can find the Cyber Snipa homepage here.
Battlefront has been developing and publishing computer wargames for many years now. Such titles include TacOps, which is used as a US Army training tool, as well as the Combat Mission series. The latest in the Combat Mission series is called Shock Force.
About the Game
Combat Mission Shock Force (CMSF) is a real-time or turn-based strategy game set in the modern world. This is in opposition to the rest of the Combat Mission series which have been set during World War II. CMSF features a single-player campaign which chronicles an invasion of Syria by the United States as well as a Quick Battle generator and Scenario Editor. It also features several multiplayer options including play-by-email.
Gameplay
Combat in CMSF depends a bit on what gameplay mode you choose to play in (real-time or turn-based). In real-time play, it runs alot like any other RTS. However, with CMSF, you can pause the game and give orders for your units to carry out when play resumes. This is an exceptional ability as strategy is the single most important element in successfully playing CMSF. While in turn-based mode (which uses the ‘WeGo’ system found in other CM games), the game runs in phases. Players will first issue orders to their troops and then set the action phase in motion. In that phase, which lasts one real-world minute, orders can no longer be sent and you get to watch the consequences of your choices unfurl, good or bad.
There are a multitude of orders to give units, and are split into four categories: Movement, Combat, Special, and Administrative. Different movement orders trade speed for vigilance, for instance, there are even orders for a unit to cover a specific firing arc – useful when running vehicles together in formation. Infantry can go into buildings (any of the various floors including the roof) for shooting position and cover, and can even tire out from running too far of a distance. All commands are stackable to help make sure your unit’s next action is not its last. In addition, morale plays a huge part in determining your troops’ willingness to follow your orders and their success in battle.
Players can command many types of units, from M1A2 battle tanks, to ‘unconventional’ forces. The armament of each unit was taken from military spec and it shows. The previously mentioned unconventional units come in many shapes from ‘Technicals’ to foot soldiers which can plant IEDs across the battlefield.
Replayability
CMSF offers the single-player campaign, a host of single missions, and a quick-battle generator which randomly creates a mission on-the-fly, based on your selected options. This greatly extends the life of this title, as every encounter is different.
AI
Enemy AI is fairly good once higher difficulties are selected. In the lowest settings, we found that enemy units will tend to sit in one spot during quick-battle missions. In fact, the higher difficulty settings can be too much sometimes. In one quick-battle, I was running my forces through a city attempting to engage the enemy at the far end (or so I thought). Much to my surprise, they had taken up residence in a building alongside one of the roads which one of my Strykers was traveling up. They proceeded to effectively ambush the Stryker, destroying it with an RPG. The ensuing chaos of locating available assets, diverting them to assist, and at some point attempting to storm the building was extremely eerie given today’s urban combat environment.
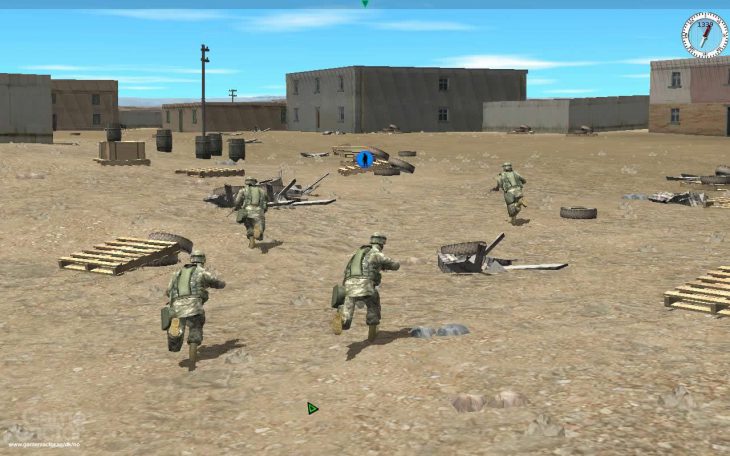
Graphics
CMSF features very functional graphics. They are sometimes very pretty, but almost always have that ‘military simulator’ look to them. The saving grace of the graphics in the game are the units, which are modeled, amazingly, to the smallest detail. Unit animations are pleasantly fluid as well. However, the graphics go to the ‘plain’ side quickly when looking at the environment. The far-off background seems parallaxed but it is of a lower resolution and appears slightly distorted. The street objects such as buildings, light poles, etc are all of low-polygon count but with the detail work on the units, you really don’t notice. The camera is nicely controllable, and can get to virtually any angle a commander could need to get battlefield awareness. Tracer fire runs rampant in CMSF, and when a battle starts heating up, the rounds fly and ricochet all over the place. It can truly be a spectacular gaming sight.
Initially, we were having some difficulties getting solid frame rates out of the title and out test rig is running an 8800gtx in Windows XP Pro 32-bit. As it turns out, there is an optimization in the Nvidia graphics card that was causing a whole host of troubles called ‘threaded optimizations’. After being disabled, the frame rate improved considerably. We expect it to get even better given Battlefront’s track record of long-term product support and patching.
Sound
Sound design in CMSF is very realistic, and all the vehicle/weapon noises were recorded from their real-world counterparts. Sound is positional, allowing you to go from faint weapons fire when hovering on high, looking down at the battle, to the bone rattling roar of vehicles moving about and even idle infantry chatter from a soldier’s eye-level.
Music
The score for CMSF is of the standard action-fare, with hard drumming military marches, electric guitar madness, and even the occasional sitar.
Multiplayer
Multiplayer can be done several ways in CMSF. The first way is to play over IP or LAN. The game can also be played on a single PC in a ‘hotseat’ mode or even a play-by-email option. Not many games allow play-by-email these days and it is a welcome addition for when friends cant play together at the same time.
Conclusion:
After spending quite some time with Combat Mission Shock Force, I have to say it is one of the most fun battle simulations I have ever played. It has the eerie realism of an embedded journalist’s footage coupled with the fun of a puzzle game. As previously stated, strategy is everything in this game. The game has a moderate learning curve but, once gotten the hang of, it is very rewarding.
Gamplay Video from Youtube:
Way back when, youngsters, there existed a company that put out some of the best video games in history. Titles such as F-117 Stealth Fighter, F-15 Strike Eagle III, F-14 Fleet Defender, and Master of Orion II just to name a few. This company was started by Sid Meier and Bill Stealey who called it…. Microprose. And, after serious financial trouble and a six year hiatus in the great beyond, some investors and ‘industry veterans’ have resurrected the software company….Or have they?
After browsing the new corporate website, it seems to me that they just bought the name to slap onto some hardware they produce (or perhaps just license from manufacturers – that is not clear). They mention the games of the past every so often, but never state they will make games again. The ‘new’ Microprose is all about hardware and cabling, NOT software development.
From the company site:
‘In 2007, the Microprose brand was acquired from Atari Interactive, Inc. (formerly known as Hasbro Interactive, Inc.). It is being restructured and relaunched by a team of veterans of the video game industry as a Video Game accessories and Consumer Electronics products firm. The new Microprose stays true to the brand, focusing on high quality products delivering to the user the ultimate experience in the interactive entertainment universe.’
And just what is the ‘ultimate experience in the interactive entertainment universe’? The answer: Digital TV Receivers. Yup, thats right, those and HDMI 3-port switchers. In what is almost a slap in the face nod to gamers, they will also make a very crude-looking gamepad/joystick (looking like a relic from 1985) which will surely have gamers lined up around the block. All of these products branded with the once proud Microprose logo.
They claim that the new company ‘stays true to the brand..’, which is true I guess, my father told me that they once had a Microprose stereo system. It was cherry. They only thing that is staying true to the brand is their use of the original logo and they added some text to it as well. Maybe that ‘brand truthfulness’ will really drive the point home, Microprose: We are the same…but totally different – hey, look at our logo!
I seriously wish them success, but I also wish they did not have to tarnish the name of one of the greatest game developers in history to get it. So I ask you, gamers who remember the Microprose that was: Is it really back?
The ‘new’ Microprose site.
Image gallery of Microprose hardware after the break.
*The opinions, beliefs and viewpoints expressed by the various authors and forum participants on this web site do not necessarily reflect the opinions, beliefs and viewpoints of the GamingShogun.com and its owners.
 In an email to Bloody Disgusting, Uwe Boll puts down Steven Spielberg, saying ‘Spielberg gets sloppy. We saw that with War of the Worlds (why the fuck the older brother survived?) and also in parts of Jaws, E.T., Munich etc.!’
He goes on to say, ‘My performance in Postal as ‘Nazi Theme Park Owner’ outperforms easily Ben Kingsley in Schindler’s List!’
What kind of Bizarro World does he fricken live in!?! Hopefully, this is just him trying to stir the pot of publicity for his sure-fire crap fest, Postal.
It gets better, as Boll will release his masterpiece of modern cinema against the new Indiana Jones movie…. His failure is almost complete…muhahaha….
Partnering with Razer once before, the Sidewinder is Microsoft’s first solo attempt at creating a gaming mouse. The Sidewinder is a very funky looking peripheral, having the appearance of something John Travolta’s character would have used in Operation Swordfish. I know it is a bizarre reference, but it means the mouse looks futuristic and cool. Its slightly blocky however, and my ring and pinky fingers never fit on the mouse quite right. In addition, it is fairly large, being roughly the same size as the Logitech G7 but more robust. The size could be a problem for folks with small hands. The Sidewinder features a mostly black plastic body with two vertical metal thumb buttons on the left side of the mouse, metallic scroll wheel, optional weights, three different dpi buttons below the scroll wheel, dpi-displaying LCD screen, and a ‘quick-turn’ option. The primary and secondary mouse buttons would be better off being rubberized like the sides of the mouse are. In their current state, the primary and secondary buttons are a bit too ‘slippery’ for my tastes.
The two vertical metal thumb buttons on the left side of the mouse are easily clickable, allowing access to two control buttons in a space usually designed for one in other mice. The thumb buttons are a bit smaller than usual mouse side-buttons, however they depress very nicely with a tactile click.
The Sidewinder features a metallic scroll wheel with a great action. Weighted, so that it is not mistakenly turned as well as detentes to allow the user better control, the wheel feels alot sturdier than on other mice we have tried and is easily one of the best features on this mouse.
With the click of a button on the underside of the unit, the Sidewinder’s weight tray will pop out to allow the user access to its three weight-slot tray. Microsoft has packaged the mouse with three 10g weights and one 5g weight. The box which the weights are packaged in also contains two different sets of feet for the mouse so you can choose the one with the glide most to your liking. The weight box can also be used to anchor the mouse chord in place, giving the user some slack in normal usage. We applaud Microsoft for giving the Sidewinder this many customization options.
Below the scroll wheel sit three buttons which change the Sidewinder’s dpi setting. These three different levels of sensitivity are set within Microsoft’s software provided with the device. When clicked, the red LCD screen on the mouse will light up with the current dpi setting of the button. This is the first time ever that a company has placed an LCD screen on a gaming mouse. Personally, I did not find much use for the screen as I did not forget what dpi button I assigned which setting, but, it is a cool addition. However, if you happen to be in an intense LAN game and forget what you set each button to, no worries, it is right there on the display – nice!
Inside the software provided for the mouse, which basically just adds features to the standard Windows’ mouse control panel, is the option to set the buttons of the mouse to whatever controls you would like. They also provide the option of setting one of the buttons to be a ‘Quick Turn’ control. When pressed, the mouse will cause you on-screen character to do a 180 degree turn – quite useful in tight spots. Gamers can also record macros in-game using the Sidewinder’s macro button. This on-the-fly capability adds an additional layer of flexibility while in the heat of battle.
The performance is very good while gaming with the laser sensor set to 2000dpi (the highest setting available) but when using desktop applications I found it appropriately ‘non-jumpy’ at 1600dpi. The sensor will decrease to 200dpi at its lowest setting and works great for super-fine sniper shots.
Conclusion:
Even though there are better mice out there when measuring pure dpi/response rate alone, one cannot dispute the amount of customization available to gamers with the Sidewinder. With its durable construction and solid performance, it is hard NOT to recommend this mouse to those looking for a gaming mouse. The biggest factor in deciding to use this mouse would be the size/shape, which not everyone will find to their liking.
The Adventure Company’s, The Experiment, places the gamer in the role of an amnesiac in an abandoned research vessel’s security control room. On the monitors in front of you, there is a woman lying in a cot hooked up to an iv. Suddenly, she wakes up and starts exploring her small room. After noticing the security camera (through which you are looking) as being active, a symbiotic relationship is borne as she enlists your help in escaping the research vessel. Your interface is in the guise of a surprisingly realistic application program with login boxes, buttons, and icons. You can pull up area maps of your partner’s location as well as log into the computer mainframe to get personnel files – barring you have the right username and password. The game can be exceptionally challenging at times, so beware, you may be frustrated at several points. This is definitely a ‘real’ adventure gamer’s game.
From the area map you can select up to three security cameras to look through at one time. Cameras are able to be panned, zoomed, and even have alternate vision modes such as night vision and thermal settings. You can drag and resize the security camera windows to your liking which also adds to the ‘application’ aspect of your interface. From the area map, you can also activate and deactivate objects such as lights, computers, and more. This has multiple purposes, the first of which is to turn the object on for it to function, of course. The second reason brings us to what must have been one of the major hurdles for the developers in The Experiment: How to control the female character on the monitors?
Controlling the good doctor (she was a researcher on board) is done by making a light source or other device activate. Once activated, the doctor will walk over to that object. If it is a usable device, she will do so. She will also ask you questions from time to time which require a ‘yes’ or ‘no’ response. When that is necessary, you actually have to make a security camera nod ‘yes’ or ‘no’. As ingenious as this control scheme is in making you feel like you are actually using a security system and communicating with this woman, it is not without fault. The good doctor sometimes has issue responding to object activations if she is already moving to a target. Also, I have seen her not move to an activated object at all for some reason even while doing nothing.
Voice acting in the game is not all that great and sometimes just comes off as plain bad. However, musically, the game is excellent. The composer, who’s name I do not have at the moment, did an excellent job constructing an eerie atmospheric score. Graphically, the game is fine. It wont be breaking any new ground but it is pretty enough for what it has to be. What is even more important are the camera views. These security cameras are not supposed to be state-of-the art devices anymore. Some will be out of focus, others with random artifacts (some wont even be able to move anymore). These filters really add to the game visually and trick you into not thinking about the graphics not being the ‘latest and greatest’.
Conclusion:
Overall, I found The Experiment to be a very rewarding and challenging adventure/puzzle game which manages to create a hodgepodge of voyeurism, lateral thinking, and atmosphere that will surely give you the willies if played by yourself in a dark room.
Smith Micro Graphics/eFrontier’s Anime Studio 5 was meant to give artists the ability to create their own cartoons and anime shows with little or no fuss and without having to have a huge production studio lying around.
Like Manga Studio, Anime Studio is laid out a bit like Adobe Photoshop with controls on the left side of the screen and more detailed tools such as layers, etc on the right side. Unlike these other products, however, Anime Studio 5 adds an additional window to the bottom of the screen: key framing. We will get to key framing later.
Ideally, you would have drawn your character in Manga Studio and then imported the drawing into Anime Studio, but something that makes Anime Studio nice is that you can also create characters in-app with the provided drawing tools. Though lacking alot of the shading features inherent in Manga Studio, the tools provided are enough to create a character without too much issue.
Once drawn in a neutral stance, it is time to add bones to your drawing. Basically, you add enough bones to your drawing in order to form what is known as a ‘skeleton’. Creating a bone consists of placement of the base ends of the bone followed by adjusting the area the bone controls. Characters will be moved by adjusting their bone positions, so this part is important. Making the bone control too much area means it will control unintended parts of your drawing. In addition, we found that the bones can sometimes move in unexpected ways. For instance, a rotation in one direction can spin the bone the opposite way for some reason. This doesn’t seem to happen often, but just enough to be annoying. When this occurs, the ‘undo’ feature is your best bet. It is not worth moving a joint back to where you think it was, only to have it create a key frame on that timestamp because it wasnt exact.
After you add your character skeletons, it is time to animate. Animation in Anime Studio is very simple. It is a key framing system, meaning that you tell Anime Studio where you want a bone to be at point A and B, then the program will go back through and fill in the points in between. This is a very convenient way of animation, although it can be tricky to get the movement just right. Sometimes you need to go back to a place in between the two points and adjust the path decided upon by the program to move your bone. However, after a bit of practice, you should get the hang of it.
You can even add a soundtrack to your animation, then export the whole thing off as a Flash, QuickTime, or avi movie file. So, as you can see, Anime Studio 5 is an excellent product at a very reasonable price point. The standard version of the program costs $49.99 while the Pro edition will set you back $199.99
Here is a sample character animation that was entirely done inside Anime Studio, from initial drawing to final rendering.
Conclusion:
Aside from the minor boning system issues, we found Anime Studio 5 to be not only a fun program to use, but also a great doorway for any artist into the world of cartoons and animation that won’t break your pocketbook.
Pure Digital Technologies has been in the ‘affordable’ camcorder market for quite some time. They developed the first ‘one-time-use’ digital cameras and camcorders you can find in your local drugstore or gift shop. Their line of highly-compact digital camcorders, the Flip, has been extremely successful with people needing to have access to quick video recording without alot of hassle. Now they have released the Flip Video Ultra and completely raised the industry bar for this class of camcorder.
Design/Construction: The Flip Video Ultra features a plastic body measuring 4.17′ x 2.16′ x 1.25′ and nicely fits in one’s hand, despite what its blocky appearance would suggest. The central body of the unit is rubberized, making it much easier to handle. The Flip Video Ultra features a slightly recessed 1.5′ TFT screen that produces very little glare, even in broad daylight. Under the screen are the unit’s video control array: A 4-way directional pad with a central record/stop button in its center. A playback and delete button are situated slightly above and to the sides of the 4-way pad. On one side of the unit is the power button and lanyard strap loop while situated on the opposite side is the TV output and USB interface.
Connectivity: One of the unit’s biggest selling points is that it has a USB connector built in, as opposed to needing a loose cable to carry around with you. The connector is housed on the end of a small arm which ‘switchblades’ out at the slide of a button. Retracting the arm is done manually, and it snaps back into its recessed housing. The USB connection itself is high-speed 2.0 spec, which transfers video from the device very quickly. The Flip Video Ultra can also connect straight to a television via an output port on the side of the unit and an included cable. One thing that bothered us about the unit was that after releasing the USB arm, it is slightly worrisome to plug in. The arm swivels about a hinge and pushing it into the port while holding the main body feels somewhat ‘unnatural’. Also, unplugging the unit means pulling it from the USB port by the main body. This also feels slightly worrisome as the arm is not directly in the middle of the Ultra. When you apply force to the main body it is not transfered equally to the USB arm, making the unit wobble a bit.
Usage: Using the Flip Video Ultra is as easy as can be. A simple press of the center red button starts recording while a second press stops it. The up and down buttons control the digital zoom while the left and right buttons control the selection of recorded videos when not recording. You can playback recorded video as alluded to before, with full sound which is a very handy feature. The unit comes with some basic editing software as well as the necessary codecs to watch/edit the Ultra’s videos. This eliminates the need for external CDs to carry about and makes the Ultra a very ‘self-sufficient’ device. The Flip Video Ultra comes with 2 Energizer-brand AA batteries as well, which is a nice step up from the usual generic brands some companies will ship out. Two alkaline AA batteries will last about two and a half hours which is not bad considering the 2GB Flip Video Ultra only records up to 60 minutes of video.
Video Quality: The Flip Video Ultra takes 640×480 video at 30 frames-per-second. The quality of the video is quite good. Much better, in fact, than the Ultra’s competitors in the highly-compact category. Recording in low light, the Ultra’s quality does not diminish much, and takes surprisingly good video. The video is compressed using the 3vix codec, which apparently still has some issues (not any fault of the camcorder mind you). We couldn’t edit any video taken with the Ultra until we removed Divx from our machine, which the 3ivx codec conflicted with for an unknown reason.
Audio Quality: One of our biggest concerns when recording is getting too much ambient noise and not enough of what we want the viewer to hear. The Ultra handles loud situations quite nicely and its microphone is able to focus on what is in front of it surprisingly well.
Druthers: If I could change the design of the Ultra in some way, my additions would be rather simple. First, I would include a lens cap/cover of some kind. It wouldn’t necessarily need to be built-in, but maybe something that would have from a lanyard off the device. Second, I would have added a 3.5mm microphone input. This device almost screams ‘Blogger’ and ‘Podcast’ so loud it could be deafening. The only thing that would totally push it past that point for me would be a dedicated microphone input. I would much rather have that feature than the TV out, especially considering you can playback your videos on the device before transferring them off.
Final Thoughts: You will notice I used the word ‘surprisingly’ in the last two sections and that is one of the best things about the Flip Video Ultra: It pleasantly surprises you constantly. Just when you think you have found a situation it cannot handle, being the inexpensive camcorder it is, it takes it and comes running back for more. Now we are not willing to trade our 1080p video cameras in for an Ultra yet, but you can bet we would supplement our footage or create video podcasts with the Flip Video Ultra any day of the week. The unit comes in two base models: 1GB and 2GB. The prior will afford the user with 30 minutes of recording time while the latter, 60 minutes. It is also available in five vibrant colors. You can also buy some very cool accessories for the unit such as an underwater case, ‘action mount’ which will connect the Ultra to a set of handlebars or any custom mount you can rig up, and even a small mini-tripod.
Test Video Compilation:
Test video note – we compressed the video from the Ultra down for this compilation – ACTUAL direct Ultra footage is even better.
Smith Micro Graphics’ Manga Studio 3 is the latest in their award winning line of manga/comic creation programs. Manga, for those of you who don’t know, is a form of Japanese comic book, which has become especially popular here in the States.
Let me preface this by saying I am not an artist by trade. Sure, I dabble here and there with 3D Studio MAX but every artistic application has its own quirks and methods of accomplishing a task. As such, I approached this program as a total nugget.
Upon starting the application, I noticed that the general layout of the program is similar to Adobe Photoshop in that your basic control box is on the left side of the screen while your layer, tone, and history boxes are on the right side.
Creating a single page in Manga Studio from start to finish is a seven step process. The first step is to pencil out a rough sketch, so I selected the pencil tool and began to eek out a very bad rendition of a space ship. What I found to be truly incredible was that, since I was using a graphics tablet to do my drawing, that Manga Studio responded to the pressure I exerted on the pad and changed the line stroke accordingly. This gives drawing in the program a much more natural feel than using just the mouse.
The next step in the process is to ink your sketch. So, I created a new layer for inking and selected the pen tool. Inking is basically tracing over the outlines of your sketch (avoiding all the unnecessary lines) with the pen tool. Again, Manga Studio adapted to my changes in pen pressure and drew the lines with different stroke widths to compensate. The inking stage is where you really start utilizing the ability to have multiple layers on a project. By using more than one layer, you compartmentalize ink of certain areas. This way, if you don’t like a specific layer you can delete that ink without erasing other sections around it. After the inking is completed, you have the option of erasing your pencil layer entirely or, like I did, just setting it to invisible.
Step three and four are to shade and texture, or, tone your scene. Selecting an area to shade or texture can be done in several ways. These methods should be familiar to anyone who has used an Adobe product. There is a magic wand tool as well as free-form lasso tools to select an area. Once I selected my desired area, I opened up the Tones window and double-clicked the tone I wanted to shade in the area with. Tones are basically the way a comic is given a sense of depth, usually with some sort of close-knit pattern to give texture as well as shading. I found this to be the most difficult process as trying to use the magic wand tool proved to be difficult if I did not make sure all of my ink lines are closed off. Otherwise it would select outside the area I wanted to shade. This being the case, I mostly stuck with the lasso tools to manually mark off my areas. Manga Studio comes with a huge number of preset tones for you to use. You can even create new ones and save them for later if you like.
Adding speed & concentration lines is the next order of the day and Manga Studio provides very useful tools for making this relatively easy. One thing I noticed was that it was very easy to get lost in your list of layers. An important tip would be to label layers very carefully as to keep them organized.
After adding your line effects, it is time to add thought/speech bubbles and text. Manga Studio allows you to create ‘organic-style’ bubbles and writing text is extremely simple. Adding text in Manga Studio is much like adding it to an image in Photoshop.
Finally, it is time to publish the page and export it into whatever file you like. Manga Studio will allow you to export your pages to .bmp, .jpg, and .psd image types. As I expected, my drawing was awful and, as such, I will not show them to you out of total embarassment. Instead, I will regale you in the image gallery with screenshots of other people’s Manga Studio work.
Final Thoughts: When read, this page creation process might not seem that daunting, and to tell the truth it isn’t after you have used the software for a while. As a newbie, though, you are bound to be a bit overwhelmed at first. Just keep learning how to use it and you should find it quite rewarding. If you are an aspiring comic artist or even an established artist looking to move into your own publications: Manga Studio 3 is for you!
You can find the Manga Studio homepage here.