Hot off my last review of Saitek’s Pro Flight Instrument Panel, I took a look at their Pro Flight Radio Panel. While gauges are fine and good, at some point you are going to need to communicate with the ground to do such important tasks as check request a flight following, acknowledge nearby traffic, or even something as simple as put in a request to taxi to the runway.
Microsoft’s Flight Simulator series has never been great at giving the player the ability to change their multiple frequencies. Usually I pause the game and fiddle with the mouse cursor, which acts my pilot’s ‘virtual hand’, to adjust the small and large increments to get them just right. This is just not fun and it generally ends with me doing auto-station flips via the on-screen ATC communication menu.
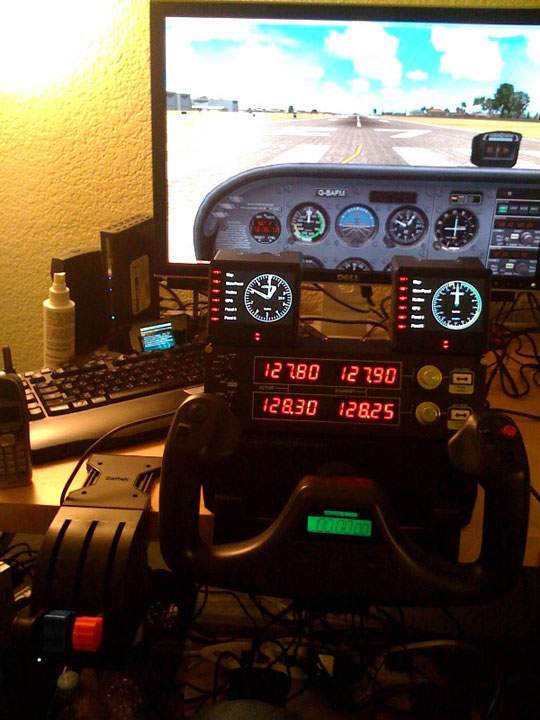
I can safely say that my radio issues have crashed and burned thanks to the new Pro Flight Radio Panel. In this peripheral, Saitek has designed a very good recreation of the basic radio stack found in civil aircraft. It features four bright LED readouts in the center of the panel as well as two heavy-duty mode select knobs on the left of the unit. To the right side of the radio panel you will find the macro and micro-adjustment knobs and standby buttons. The construction of the frame is in keeping with all of the Saitek Pro Flight panels and is a heavy-duty black plastic.

Its mounting frame which gets screwed into other Pro Flight peripherals (most likely the Pro Flight Yoke) is still a bit flimsier than I would like to see but it doesn’t get too much in the way. Using the Radio Panel is very simple. After mounting the unit where you like, simply install the included software and you will be all-set to use it in FSX (Microsoft’s Flight Simulator X). It is really that easy to get up and running.
Loading up FSX, I start on the parking area at KRAL (Riverside Municipal – my hometown’s airfield). I then bring the map and begin to plan my flight. For today’s excursion I plan on arriving at Orange County’s John Wayne-Airport (SNA). Its a short flight and going by visual flight rules I don’t expect any real delays or problems. Clicking on the two airports I write down both their control tower and ground frequencies. My short-range setup is to have my departure airfield as COM1 and arrival airfield as COM2. Manipulating the dials on the right of the top panel, with the left knob selecting ‘COM1’, I reach KRAL’s ground channel and hit the ‘standby’ button, which switches the ‘active’ and ‘standby’ frequencies with the other. This system allows you to setup a frequency in-flight, if you like, before you actually need to switch over to it. So with KRAL’s ground frequency as the active one and its tower frequency in the standby position, COM1 is all setup. I follow the same algorithm to setup COM2 with SNA’s ground and tower frequencies.
Thankfully, the Radio Panel is responsible for a whole lot more than just your COM channels. You can also setup your NAV frequencies in the same manner! In addition, Saitek has had the forethought to add additional modes like your transponder frequency as well as DME and ADF frequencies – very vital things to have so handy in navigation.
The added-convenience and tactile-feedback provided by this panel is incredible. In the image below, you can see the radio panel glowing in all its glory in lower-light conditions.

The worst issue with the Radio Panel is that even though the frequency adjustment knobs have detents built-in to give you tactile feedback when turning them, they do not always match up to the frequencies. Sometimes, you will find that you hit the frequency you are looking for in-between knob detents, forcing you to wiggle the metal control a bit until it aligns correctly.
While some would argue that the Radio Panel’s $149 dollar price point is expensive, I would say that when you look at other panels of the same function you are actually saving money by using the Saitek model in your home cockpit. GoFlight sells a larger panel of similar function and it retails for over a thousand dollars. While it is of more realistic construction than the Pro Flight Radio Panel, for the average virtual pilot you are getting a whole lot more out of your dollar with Saitek’s peripheral.
Overall, the Saitek Pro Flight Radio Panel is an excellent addition to the Saitek Pro Flight range and to your home ‘pit. It provides a ton of convenience in giving you easy-to-access radio frequencies as well as provides a new level of realism in your home cockpit with its crisp LEDs and tactile feedback.


