Ever since we saw the X-Men’s Danger Room or even Star Trek: The Next Generation’s Holo-deck, we geeks have coveted the idea that one day we could bring virtual reality into the home. Unfortunately, the technology has never really taken off and the stuff that has is extremely expensive and not geared for the type of applications most of us would use it for: gaming! So when we saw that VUZIX was offering head-tracking technology in their iWear VR920, we knew we had to check them out.
The VR920’s form factor is very similar to their iWear AV920 model – which is basically the same thing as aforementioned ‘VR’ model minus the head-tracking. It features an all-black plastic design and is meant to be worn on the face like Geordi LaForge’s visor. I will tell you that no matter how much time VUZIX puts into making these things cool and stylish, it is always going to put some folks off. These iWear devices are undoubtedly geeky and will always be so until they figure out how to project information onto your contact lenses. The only reason a visor looked so good on Levar Burton is because he is cool (Star Trek AND Reading Rainbow? Please…) no matter what is on his face. Case in point…

See what I mean? Now, inside the VR920 you will find two 640×480 LCD screens, each containing 920,000 pixels of visual goodness. VUZIX claims that when viewing these little displays at the range they are away from your eyes in the VR920, it is simulating a 62” display at 9′ away. I don’t have a 62” display to test this claim out on but just using my own experience with the VR920 I would say that is about right. The two LCDs may be little but they are very crisp and clear especially when considering they are only a few inches from your eyes. Remember when Mom said not to watch TV so close or you’ll go blind? Not with these babies you won’t!
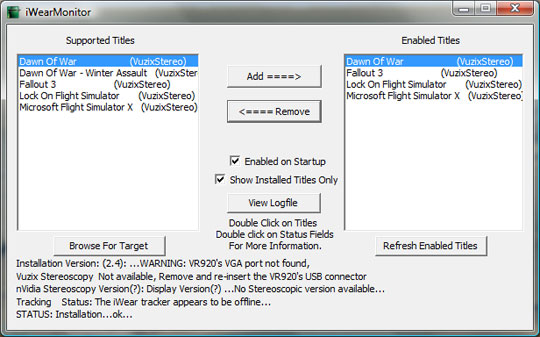
Actually, the biggest issue of the VR920 is not its performance at all (more on performance later) but, instead, its installation and setup. Installing the unit goes something like this: First, install the VR920 software located on the included CD-ROM. Then, connect the VR920 to a VGA connector on the back of your video card. Thankfully, VUZIX has included a DVI-VGA adapter in case you do not have a VGA port open. After connecting the VGA cable you then plug in the VR920’s USB cable to an available USB 2.0 port. After these steps, you need to configure your displays to actually allow you to see your desktop on the unit. You have to attach and set the VR920 display to either 1024×768, 800×600, or 640×480 and set it to clone your two displays. After doing this you should have a mirror image of your desktop displaying on your VR920. After this you much calibrate the head-tracking functions of the device using the included software. Finally, the included iMonitor software will scan your PC for any available programs which use the stereo 3D and/or head-tracking functions. The first time you are ready to play one of the game’s you see listed on the iMonitor, you should double-click the listing and the program will bring up precise setup instructions. Sometimes you will have to copy drivers around your machine to the game directory and other times you will find such action was already done for you by the iMonitor. Still with me? I told you there was a lot to setting up the VR920! However, you did not buy this thing to collect dust on a shelf so be sure to read all the instructions available to save yourself valuable time. The whole install process is not very user-friendly and may turn a lot of casual PC users off. Then again, I don’t see the casual PC user buying this thing so to my hardcore brethren out there: You can handle it!

The first game I tried the unit out with was Bethsoft’s Fallout 3. I have to admit I was skeptical about running Fallout 3 in 1024×768 mode, regardless of the stereo 3D technology it supports via the VR920. I was pleasantly surprised: The 3D effect in-game was very believable and I did not once get the eye-strained feeling I get when viewing IMAX 3D movies at the theater. Well done, VUZIX! Even in the lower resolution, the game still had a great amount of detail and the explosions of the fatman’s mini-nukes really just displayed in a cool, new way.
In Fallout 3 the head-tracking did not help all that much. It basically uses your head movements to control the mouse axes and, as such, the view/aim. For some reason, during my play sessions of this game, the head-tracking was not very sensitive and I did not get a whole lot of in-game movement for my real-life head turning. Even when turning my head in a smooth manner as recommended by the instructions, it just was not working correctly. Thankfully the 3D effect was still kicking some major super-mutant haunches so I give it high marks.
That is something I should caution you on: There are a limited number of titles which support the two technologies, and not inclusively either. You can find the whole list of supported games and what modes they are compatible with at VUZIX’ official site.
After Fallout 3, I figured the next kind of game to try the VR920 out on would be the latest in Microsoft’s seminal flight simulator series. Flight Simulator X was reported to support both head-tracking as well as stereo 3D, at least according to the iMonitor, so I figured it would be smooth sailing. As it turns out, FSX did not enable either head-tracking or stereo 3D in-game. So I went through the iMonitor instructions for hot to setup the game an drealized that for some reason it did not copy over the right DLLs into the FSX directories. After manually performing these steps, all seemed right with the world. Using the head-tracking in FSX brought a whole new level of immersion to the sim as did the very well-done stereo 3D. On strictly a flight-sim level alone, this product is well-worth it if you are a hardcore sim-jock looking for the next step in realism.

Aside from the gaming applications, the VR920 is also great for watching your favorite TV shows on HULU or your local drive. The video usually displays very well, save for some issues with files featuring lesser-known video codecs, and we would also recommend using the VR920 if your PC had a cable TV tuner.
The VR920 also worked well with other desktop applications such as MS Office. Why you would want to type a novel looking through the unit is beyond me but, the point is, you could. I actually found text slightly blurry at 1024×768 but when I wanted to strictly read text docs, etc, I set the resolution to 800×600 and had no more issues.
Comfort is not a problem either after getting the visor in place although the big headed should take care when placing it on their noggins. The visor holds to one’s nose via an adjustable clip which works well. The arms of the visor can pitch 15 degrees to better lineup the screens with your eyes and the unit even has an integrated microphone for VoIP applications.
Overall, VUZIX’s iWear VR920 may not be the end all, be all perfect solution for a consumer VR headset out there but its value is clearly apparent in both the stereo 3D and head-tracking of its supported game titles plus its relatively low price point in comparison to other VR units on the market. Despite its wonky setup process, the unit has plenty of bells and whistles to make it worth the time and money needed to use it. The VR920 retails for $399.95 and is available now.


