
Recently, iBuyPower sent us over one of their latest gaming rig configurations: The Gamer Power BTS11. Built for the student headed back to school (hence the “BTS” designation), the rig promises great performance at the very reasonable price point of $999. Unfortunately, many PC-makers fall into the trap of cutting too many corners to come in under the $1,000 dollar mark. Will iBuyPower be one of them? Read on, After the Break, to find out!
Official “Gamer Power BTS11” Tech Specs
- Case
- NZXT Phantom (White)
- CPU
- Intel Core i5-2500K
- iBuyPower 120mm Liquid Cooling System
- Motherboard
- Gigabyte GA-P67A-D3-B3
- Video
- Nvidia GeForce GTX-550 Ti
- iBP Labs Technology
- iBP Specialized Advanced Packing System
- Power
- 700W Power Supply
- Memory
- 8GB (2x4GB) DDR3-1333
- HDD
- 750GB SATA-3 7200RPM (64MB Cache)
- Optical Media
- 24x DVD+/-RW and CD-RW combo drive
- Operating System
- Microsoft Windows 7 Home Premium
- Front Panel Connectivity
- 1x Mic-in
- 1x Headphone-out
- 2x USB 2.0
- Peripherals
- iBuyPower Multimedia Keyboard
- iBuyPower Optical USB Mouse
- Warranty
- 3-Yr Limited Warranty + Lifetime Phone Support
- Price
- $999
Outside
When looking at the Gamer Power BTS11 from the outside, its most notable feature is the beautiful, if not a bit large, NZXT Phantom gaming chassis. This case is a stunning piece of work that, while taking up a lot of desk space, we hoped would feature a great deal of internal space. It also reminds me of a Stormtrooper’s armor, but I digress…
On the upper-front panel, you will find the power and rest buttons, two USB 2.0 ports, microphone input, and headphone output ports. The front panel of the chassis flips open to reveal the various bays. In this particular configuration, there are four additional 5.25″ bays in case you want to expand by adding a Blu-ray disk drive, etc. Additionally, there are fan speed control sliders gracing the top of the chassis, allowing you to customize fan speeds to your liking. The fans can be quite noisy when on full-blast, so if you are not gaming you may consider turning them down some.

Inside
Inside the system, we found the chassis to be pleasantly-roomy with some nicely-done cable management. The tidy innards are further enhanced by the inclusion of iBuyPower’s 120mm Liquid Cooling solution for the CPU. The all-in-one cooler doesn’t take up much space and is self-sustaining, without the hassle of having to change the coolant, etc, that plagues home-built liquid cooling solutions. This allows for a smaller heat exchanger to be placed on top of the CPU as opposed to stock or aftermarket air-cooled options, which can get quite massive. The liquid-cooling setup features a 120mm fan and radiator built into the back of the case.
The Nvidia GeForce GTX-550 Ti GPU is not a very large card when compared to the other monsters on the block. However, it is still no slouch in terms of size and, even so, fits into the chassis with plenty room to spare. In fact, there is so much space inside this chassis, you would have no issues with adding additional GPUs or miscellaneous drives, etc. We would caution, however, that there is only a 700W power supply in the rig and, unless upgraded, might not be enough to handle additional GPUs.
Finally, the good folks at iBuyPower also did a bang-up job with the cable management inside this rig and that means cooler temperatures and increased airflow for all internal components.

Internal view of cooling system and GPU.

Internal view of power supply and cable management.
Setup
One very important thing to take note of regarding this unit is that you should NOT plug it in and turn it on right out of the box. If you do this, you will probably break it (in fact, MOST likely break it) – you have been warned! The reason for this is that iBuyPower has included a really bizarre internal foam blob within the PC. It looks to have been actually formed inside the chassis, meaning it is very tightly-fit. What does this mean? Well, for starters, it means your components are not going to go bouncing out of their rightful places during shipping! iBuyPower has included a warning pamphlet and instructions on removing the foam stabilizer, but if you are impatient and not prone to reading (in which case you won’t see this) you could miss it.
After removing all of the packing materials and plugging everything in, we booted the PC for the first time. It smoothly transitioned into the Windows 7 Home Premium OS and asked us to set a password for the default user. Getting to the desktop, we checked out the hardware drivers and found they were all up-to-date and ready for work (or play). Next on our list of things to do was connect the rig to our wireless network. Unfortunately, there is no wireless adapter built into the motherboard – only LAN ports. This can be easily-rectified by a USB wireless adapter. However, for a “back to school” rig, I would have hoped that iBuyPower understood some students only have access to wireless networks and included that capability.
Bios Options
The Award BIOS firmware loaded into the rig has some very cool features, including a whole section for tweaking various hardware resources. This section is called the “MB Intelligent Tweaker(M.I.T.)” and will allow you to mess with just about every setting you can think of for your CPU, RAM, and more. Aside from this, the BIOS options are pretty standard.

Included Software
Thankfully, iBuyPower has seen fit not to bog down the Gamer Power BTS11 with unnecessary software or bloatware. The only thing included on the system which may be unnecessary for some is a non-activated version of Microsoft Office 2010. After uninstalling that, I found that iBuyPower also included a few of Gigabyte’s applications for managing motherboard resources, including EasyTune 6. EasyTune 6 allows for simple and safer overclocking of the PC’s CPU, RAM, and GPU systems. With the all-in-one cooler on the CPU, this rig definitely has OC potential, however for the purposes of our review we stuck to the stock settings. Please note that there are a few Gigabyte applications that were not bundled with this package, including the On/Off Charging and the Cloud OC utilities. See the motherboard’s official product page to download these for free. After checking out the system’s software, we installed Valve’s Steam PC gaming service and began downloading a few titles to test out along with a couple of benchmark applications from Futuremark.
Benchmarks
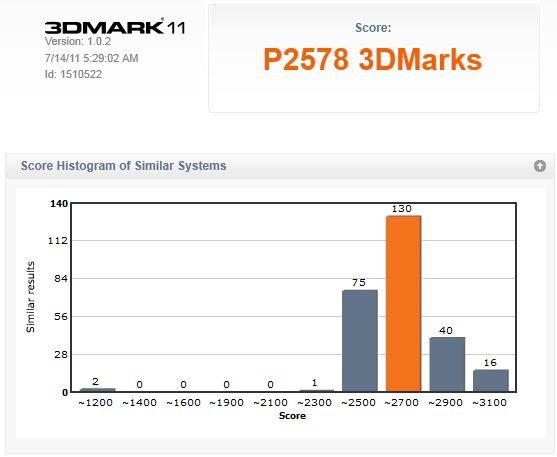
Our first benchmark was a test of the Gamer Power BTS11’s gaming prowess with Futuremark’s 3DMark11 Basic Edition. We tested the Gamer Power BTS11 using the benchmark’s “Performance” level preset, using a resolution of 1280×720 (720p). This is also using the out-of-the-box CPU clock speed of 3.30GHz:

3DMark11 Basic Score and Graph
The second benchmark we ran the Gamer Power BTS11 through was using Futuremark’s 3DMark Vantage Basic. We tested the PC with the benchmark’s “Performance” level preset and a resolution of 1280×1024. This is also using the out-of-the-box CPU clock speed of 3.30 GHz:

3DMark Vantage Score and Graph
According to Futuremark’s two benchmarking applications, these results fall at least within the average levels for similarly-equipped PCs. In terms of numbers, the PC is well within the bounds of a $999 dollar rig. However, these are just benchmark applications – how does it actually play real-world games?
Gameplay
The first game we ran the system through was Bethesda Softworks and Obsidian Entertainment’s Fallout: New Vegas. For our play-throughs of New Vegas, we ran the game in 1280×1024 with the visual options set to “Ultra”, and 8x anti-aliasing, sans vertical sync. The game played smoothly and the Mojave wasteland looked awesome as ever. Please be aware that all screenshots shown below are grabs from the games being run on the BTS11.

The second game we played on the system was Activision’s Call of Duty: Black Ops. Playing the game at 1280×1024, all settings to their highest save for anti-aliasing being placed at 8x, the game ran smoothly and without issue. Also, the on-board sound chipset put out beautiful surround sound and the game was a blast to run through on the machine.

Next on our playlist was Codemasters Operation Flashpoint: Dragon Rising. The tactical war game, while not living up to everything originally promised (not the fault of iBuyPower), still looked great with large plots of land to explore in every mission. The game ran like a hot knife through butter. We ran the game at its highest visual settings in the resolution of 1280×1024.

The final game we ran the BTS11 through as Metro 2033 – a post-apocalyptic shooter game with heaping amounts of horror and suspense. Also, the game is a visual treat and takes advantage of DirectX 11 features. So, we fired it up in DirectX 11 mode with the “High” preset enabled at a resolution of 1280×1024. Again, we were very pleased with how this rig performed and spent far too long playing while we should have been benchmarking. The first time I played Metro 2033, my personal PC was severely underpowered for the task. With this rig, not so much.

Productivity
Now that we have benchmarked the Gamer Power BTS11’s gaming abilities, we will take a look at what it can do for your student in other arenas, such as playing beer pong and dancing in night clubs… Seriously, though, we mean in the realm of school work! After finishing off the games on our plate, we installed Adobe’s Photoshop CS 4, Microsoft Office 2007 Ultimate, and Microsoft Visual Studio 2010 Ultimate.
We manipulated images, wrote a draft of this very review in Microsoft Word, and even coded several “Hello World” applications in the various languages supported in VS2010. After many nights of this, we are convinced that the BTS11’s ability to give your student the tools to do their school work are simply excellent. The PC is packing a very efficient Sandy Bridge CPU as well as a fast HDD (with 64MB cache) and lots of DDR3 RAM to boot – more than enough to tackle any school project that a visual arts, computer science, or English class can throw at it.
Final Thoughts
The iBuyPower Gamer Power BTS11 gaming PC is an excellent choice for a $999 dollar gaming rig. It features good gaming performance, beautiful aesthetics, and a reasonable price point – perfect for students going back to school or simply looking for a solid and economical base chassis to build up in the future. Additionally, the machine’s liquid cooling solution will add life to your CPU should you choose to overclock which, again, we were not looking at here for product safety reasons. The only thing I would have done differently in building the rig is add a wireless-N adapter in into the mix.
[wpcol_1half id=”” class=”” style=””]
Pro’s
- Good gaming performance.
- Visually-striking appearance.
- Good value for price.
[/wpcol_1half]
[wpcol_1half_end id=”” class=”” style=””]
Con’s
- No built-in wireless adapter.
[/wpcol_1half_end]
iBuyPower’s Gamer Power BTS11 gaming PC will be launched the last week of July for $999 over at their official website.